

How To Draw A Eyebrow Step By Step For Beginners
- Home
- Portrait Drawing
- How to Describe Eyebrows
How to Draw Eyebrows

Eyebrows can vary greatly in shape and size. Fortunately, there are a few simple guidelines we tin follow to larn how to describe eyebrows convincingly and realistically!
The 'trick' to drawing eyebrows (or any challenging texture, actually) is to stop thinking of them as eyebrows, or even hair. Instead, for at least the first one-half of the drawing process, we demand to remember of the eyebrows just equally shapes and values. This is a very important, but sometimes challenging, mindset shift! To help alter your perception and learn to view complicated subjects every bit shapes and values, have my gratuitous Mini-Course, which features video lessons on these essential concepts.

If I were to distill the procedure of drawing an countenance into iii central points, they would be:
- Work 'from general to specific'. In the eyebrows to a higher place, find that a big portion of each one tin can be massed or grouped into a fairly simple shape. That is exactly how I'll start my cartoon: by initially simplifying and grouping the eyebrow into one or two basic shapes, and gradually working up to the specific details like individual hairs.
- Expect for similarities in the eyebrow. Once I take established my basic shapes and proportions, I will showtime looking for more specific groupings of similar eyebrow hairs: Where practice they overlap? Where are they similar in proximity, management, angle, length or value?
- Look for variations in the countenance. Where are the hairs distinctly dissimilar? Where practice they change direction? Where are the most evident value shifts?
The balance of unity and variety (or similarity and deviation) is one of the cornerstones of composition, and we can make great use of it when cartoon this countenance.
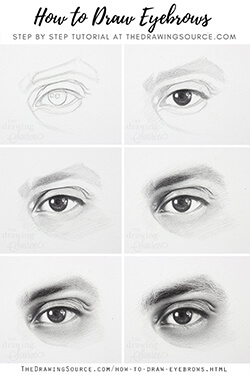
Let's jump right into the tutorial and expand upon these guidelines! Or, download the reference photograph of the eye I'chiliad drawing, an infographic of this tutorial (beneath), and draw forth with me.
I will be using Staedtler Mars Lumograph graphite pencils: HB, 2B and 4B.
Downloadable Resources
Go the reference photo of the eye I'm drawing hither!
Become the countenance tutorial infographic here!
How to Draw Eyebrows
Step 1:
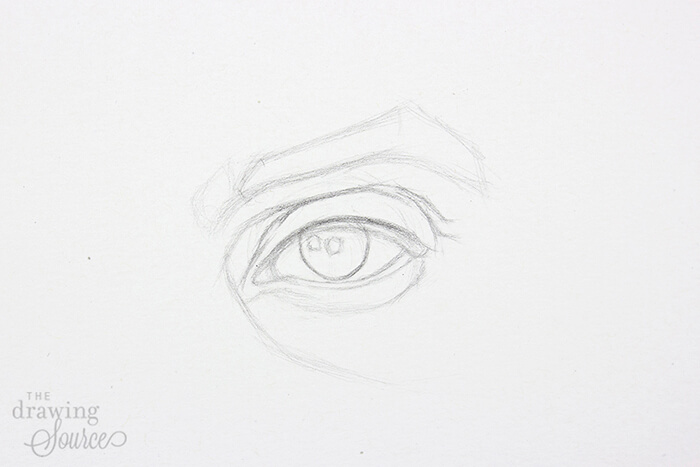
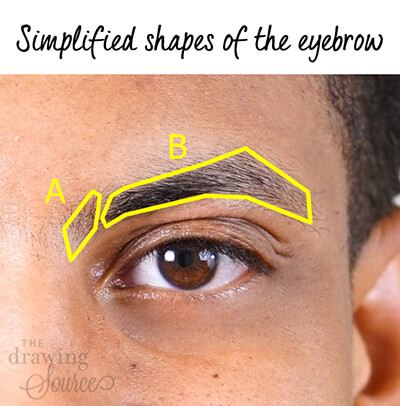
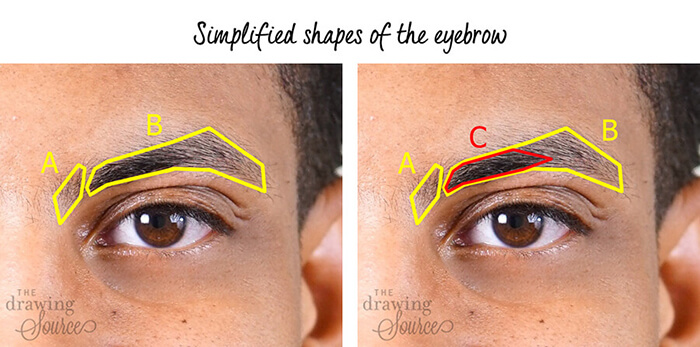
As with near drawings, I begin this one by blocking in the basic, simplified shape or couple of shapes of the eyebrow using line. To make up one's mind what the major groupings are, I can squint at the countenance, which merges many of the details to create a more defined, solid shape. I likewise look for major divisions, such equally the i between shape A and shape B, which I bespeak in my line drawing.
During this cake-in stage, my priorities are:
- finding and indicating the major angle changes of the eyebrow
- drawing the right proportions of the eyebrow, and
- establishing the correct alignment of the eyebrow with the eye itself.
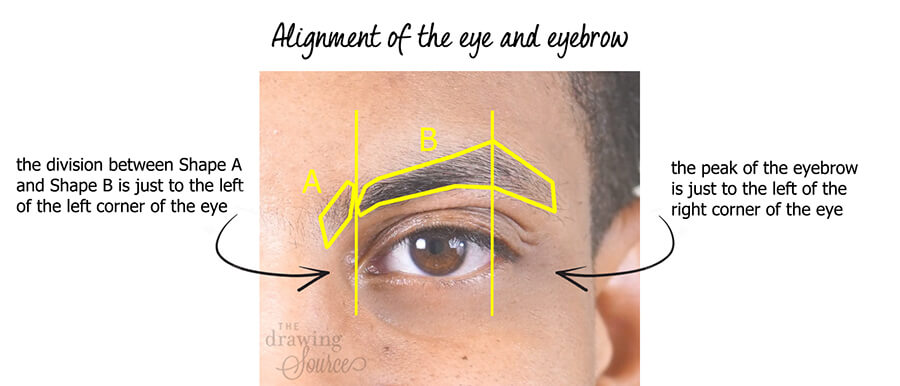
I tin do this by lining up my pencil with the peak of the eyebrow, for instance, and checking which part of the eye it aligns with (run into the diagram below). And then, I mimic this alignment in my drawing.
![]()
How to Depict Eyebrows
Stride 2
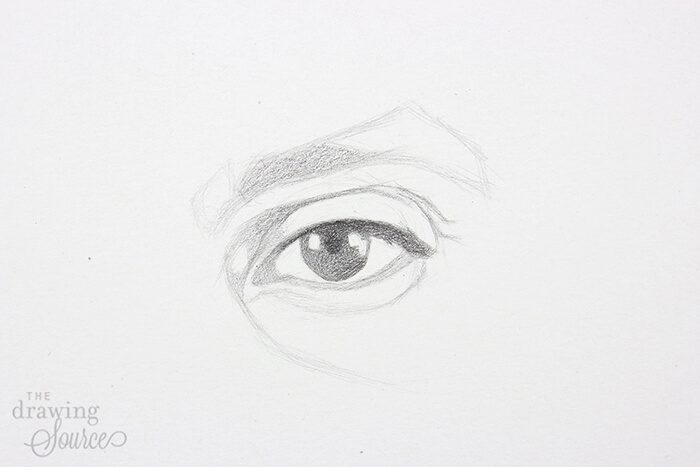
Though I will focus primarily on drawing the eyebrow in this tutorial, considering the eye and eyebrow are developed simultaneously, the two are inextricably linked, and I will mention some of the eye-drawing steps when they pertain to the eyebrow. Bank check out my step by step tutorial specifically on drawing realistic optics hither.
In this footstep, I'yard starting to look for the value construction of the middle and eyebrow: where are the lite values, middle values, and dark values? (Check out Lesson 4 of my free Mini-Course to learn how to develop the value structure of your drawing!)
Specifically in the eyebrow, there is a dark shape inside Shape B, which I'll call Shape C (pictured below). This shape is one of the darkest areas in the entire scene. I've indicated Shape C on my drawing using a slightly darker value.
I prefer to build upwardly my values gradually: because dark values are difficult (and sometimes impossible) to erase, I desire to exist quite certain that everything is in the right place before I commit to fully concealment them.
How to Draw Eyebrows
Stride three
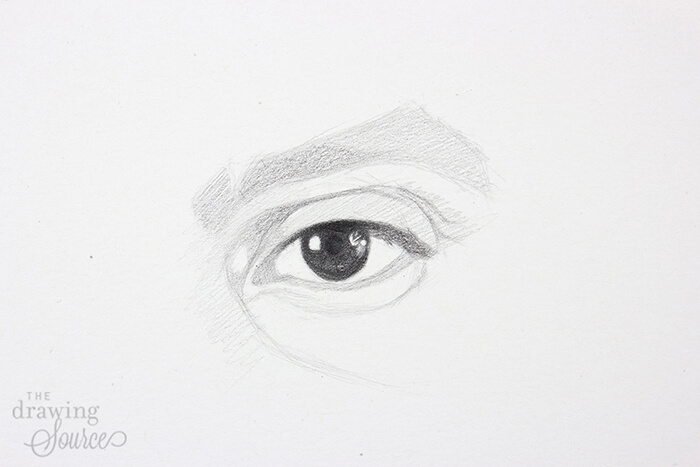
I take filled in the rest of the eyebrow with a light value, leaving a slight value difference between the darker shape and lighter shapes.
Notice that I am not at all concerned with drawing 'hair' yet!
A cardinal to cartoon realistic eyebrows is non to get caught up in drawing every single hair. Instead, we need to 'see through' these details, initially ignoring them as much as possible, and instead paying attention to shapes of values.
Though the pupil and iris of the eye are not completely finished, I focused on rendering them so as to take a variable that I am confident and certain in, and can at present compare the residuum of my proportions, values, and placement to.
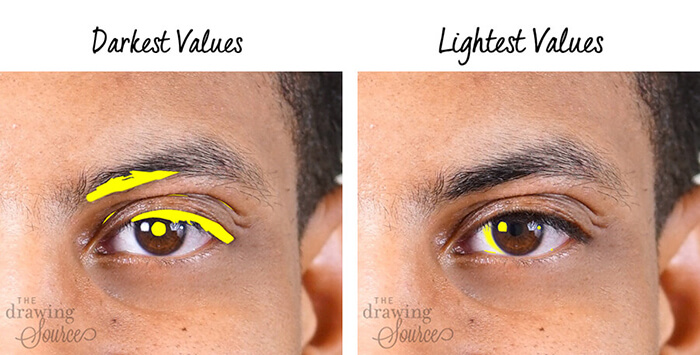
How to Describe Eyebrows
Footstep four
Here I'm beginning to institute the 'value extremes' in my drawing: the lightest and darkest values in the scene (pictured below).
How to Depict Eyebrows
Pace 5
Notice that the eyebrow is already starting to resemble hair even though I haven't fatigued any individual hairs! Here I've darkened the eyebrow, particularly the dark shape that I named 'shape C' earlier. The subtle pencil marks I applied are already starting to 'read' equally hair, only because I applied them in the direction of the pilus. However, I am still only looking for shapes of value.
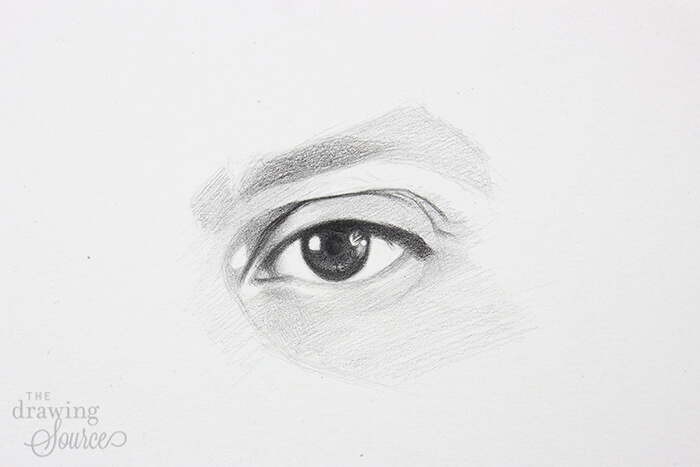
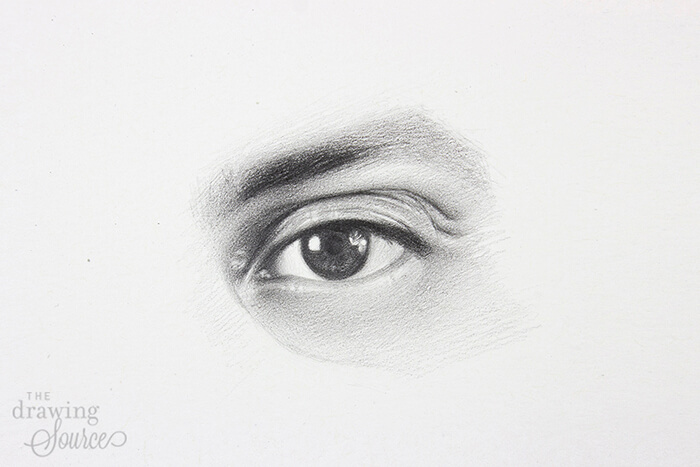
How to Describe Eyebrows
Pace 6
I accept farther darkened and defined the dark shape of the eyebrow, and accept started 'turning' the smaller forms of the eye, such as the folds in the upper eyelid, and the subtle gradations in the lower eyelid.
Notice that the edges of the eyebrow are nevertheless fairly soft. (To learn about the essential concept of Edges, watch Lesson 6 of my gratis Mini-Form!)
Now that I have massed in every bit much of the countenance equally I tin can, and built up a range of center values in the centre, I am finally set to turn my attention to some of the individual hairs in the eyebrow.
Am I going to depict every unmarried 1 of them? Not at all! Personally, I am non interested in a hyper-realistic representation here. I prefer a more naturalistic wait, and can accomplish this past selectively choosing which eyebrow hairs to signal.
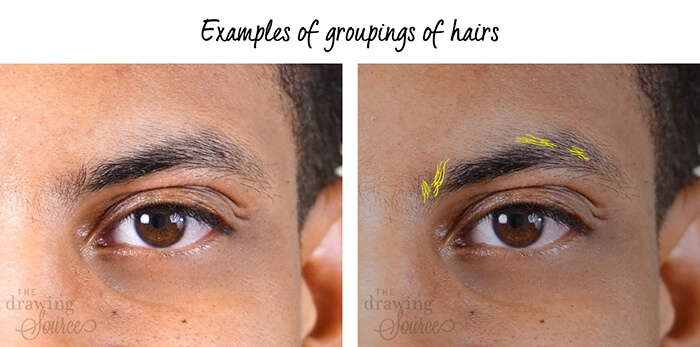
To brand my decision, I expect for:
- Changes in the direction of the eyebrow hair, and where these changes of management are most noticeable

- Which hairs are most prominent? (Many of the arrows below are like to the ones above because the most prominent hairs bear witness the changes in direction most apparently!)
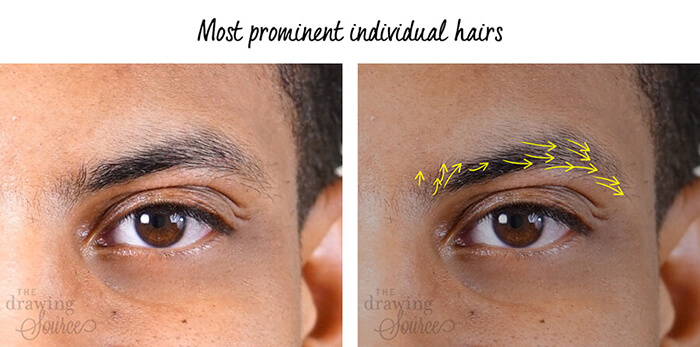
- Groupings of hairs that I tin can signal (they can exist 'grouped' based on their proximity to each other, or by their like direction)
![]()
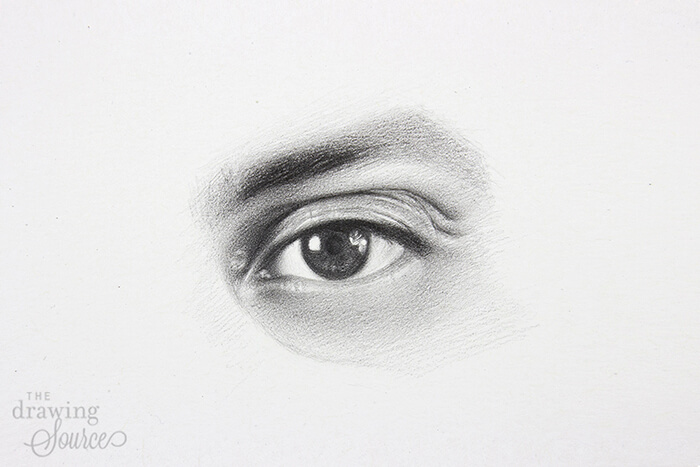
How to Describe Eyebrows
Footstep seven
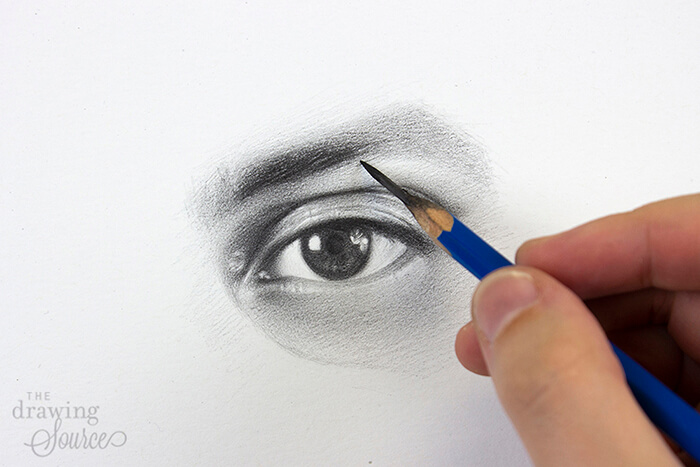
Once my analysis is complete, I starting time drawing in some of these individual hairs, paying shut attention to their spacing, thickness, and length. T hey are not equally spaced or the same size! To create a likeness of our model, we must pay attention to the specifics of this item eyebrow. Equally soon as a few of my marks beginning to wait the aforementioned in length or spacing, I know it's time to look more closely at my model or my reference photo, whichever I am drawing from.
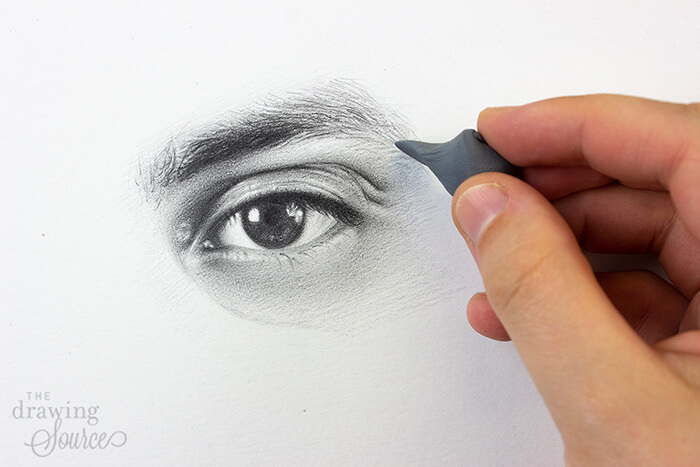
How to Depict Eyebrows
Pace eight
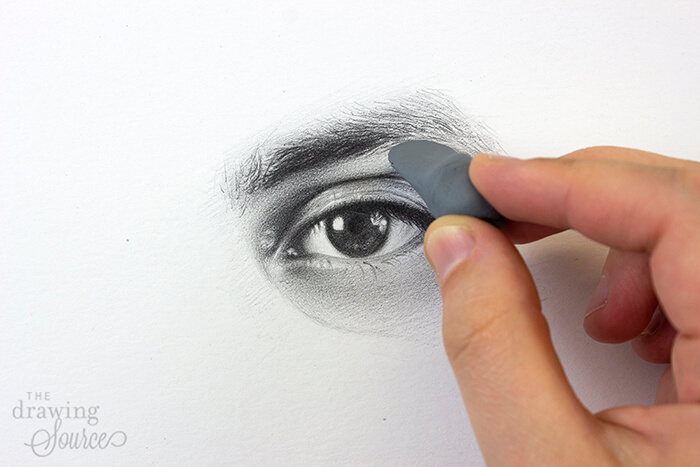
I am using my pencil and kneaded eraser almost equally during this step. In item, I lean heavily on the 2d technique that I demonstrate in my kneaded eraser technique video: flattening the kneaded eraser to requite it a sharp edge, and and so using information technology to create some of the lighter separations between the hairs that can be seen in the reference photograph.
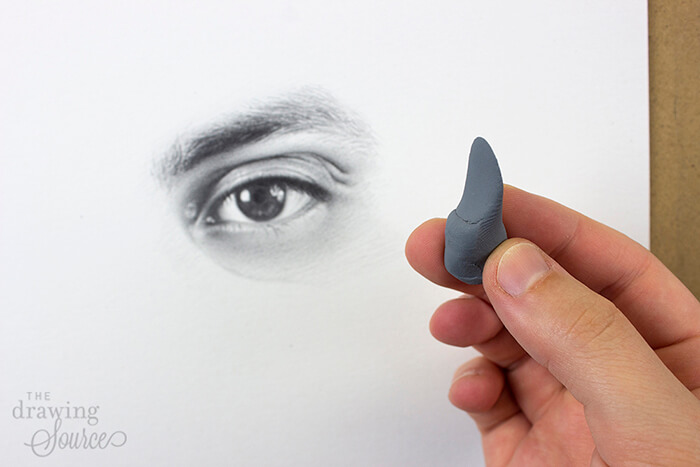 Flattened, sharp edge of the kneaded eraser
![]()
The Finished Drawing

Is my finished drawing an exact replica of my model's eye and eyebrow? I'grand sure that information technology's not! Withal, the likeness and character of this individual's particular countenance is at that place, and that was certainly the goal!
Notice:
- All of the unruly hairs that I indicated to add vitality and life to the cartoon, as opposed to depicting them unrealistically evenly and facing the same direction.
- That I selectively darkened some of the individual hairs and left others rather calorie-free. This kind of variation can add together involvement and realism to a drawing.
- That in that location are no sharp edges along the top ridge of the eyebrow. When drawing whatever kind of hair, squint at the subject to determine where the sharpest and softest edges are in guild to create a realistic illusion! (Learn near Edges in Lesson 6 of my free Mini-Grade).
Downloadable Resources
What side by side?
Why not download the reference photo of this eye, an infographic of this tutorial to remind yous of the steps, and draw it yourself!
Happy Cartoon,
![]()
![]()
Enjoyed this page? Please share it!
Share buttons and pinnable image below:

If y'all enjoyed this tutorial on how to describe eyebrows, you may also enjoy ...
Related Pages:
How to Describe Realistic Eyes (Step by Stride)
6 Most Common Center Drawing Mistakes (and how to avoid them!)
How to Depict Pilus (Step by Step)
How to Draw an Ear (Step by Stride)
Return to Portrait Drawing from How to Depict Eyebrows

Source: https://www.thedrawingsource.com/how-to-draw-eyebrows.html
Posted by: cundiffthaveling73.blogspot.com
0 Response to "How To Draw A Eyebrow Step By Step For Beginners"
Post a Comment